Implementing a Fully Convolutional Neural Network
Motivation for Fully Convolutional Neural Networks
When I created a convolutional neural network for digit recognition in the previous post at some point I flattened the 2D structure to a 1D structure representing the structure of the predictions that I cared about, which was a sequence from 0 to 9 (1D).
For other tasks the predictions I care about might have different dimensionalities. If I would like to know what class or classes each pixel belongs to I would be doing what is called image segmentation and the structure of predictions would resemble the same structure as the input image. This is the motivation for Fully Convolutional Neural Networks (FCNN). At no point do we want to flatten the initial structure of the data and loose that information, therefore convolutions are used throught the network up to (and including) the prediction layer.
Objective
I will create a neural network for image segmentation. The network will predict for each pixel the class it belongs to. To point out there is a difference between image segmentation and instance segmentation. The later is predicting which instance of which class every pixel belongs to. For image segmentation knowing which class a pixel belongs to is enough.
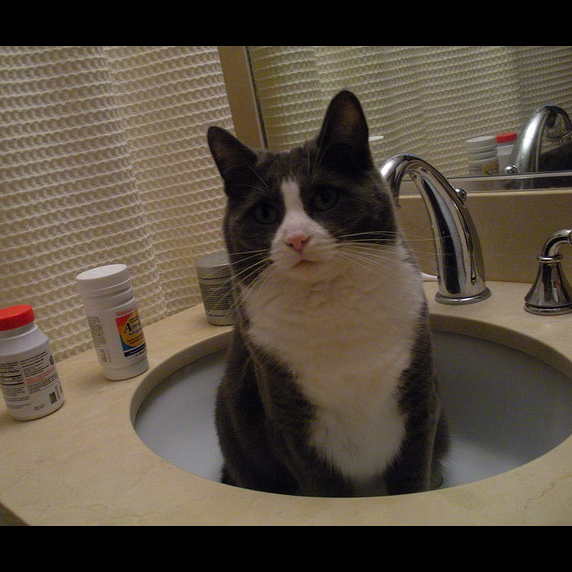
For simplicity the network I’ll create will learn how to detect pixels that belong (or not) to cats. This is a two class image segmentation task.
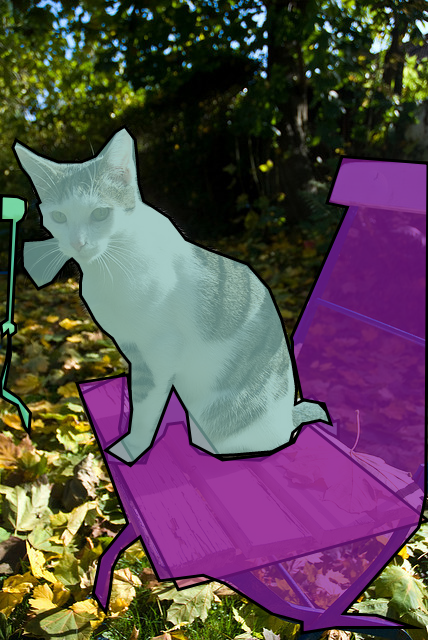
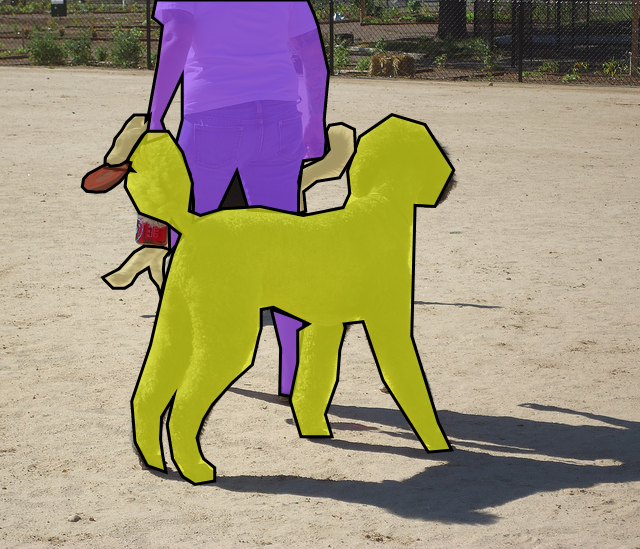
Ground truth
Bellow are illustrations from the COCO Dataset that show images overlayed with masks of different colors representing different instances of different classes. These are manually created and although they are actually instance segmented data it will serve as ground truth to train a neural network used for image segmentation.
|
|
|
|
|
Methodology
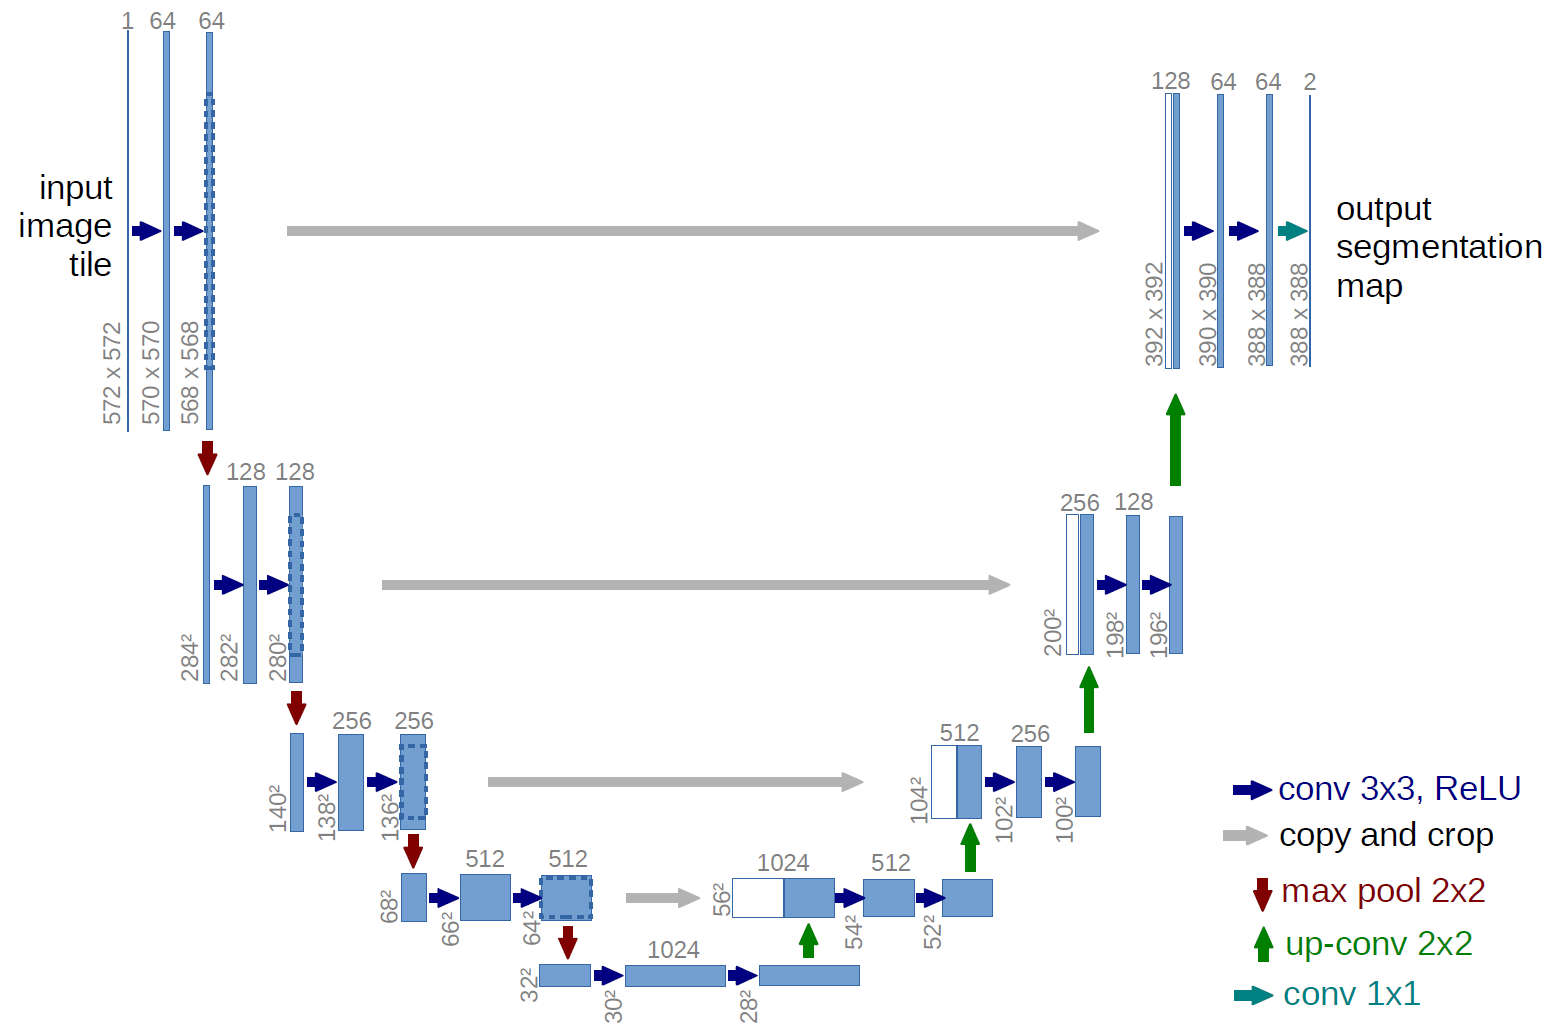
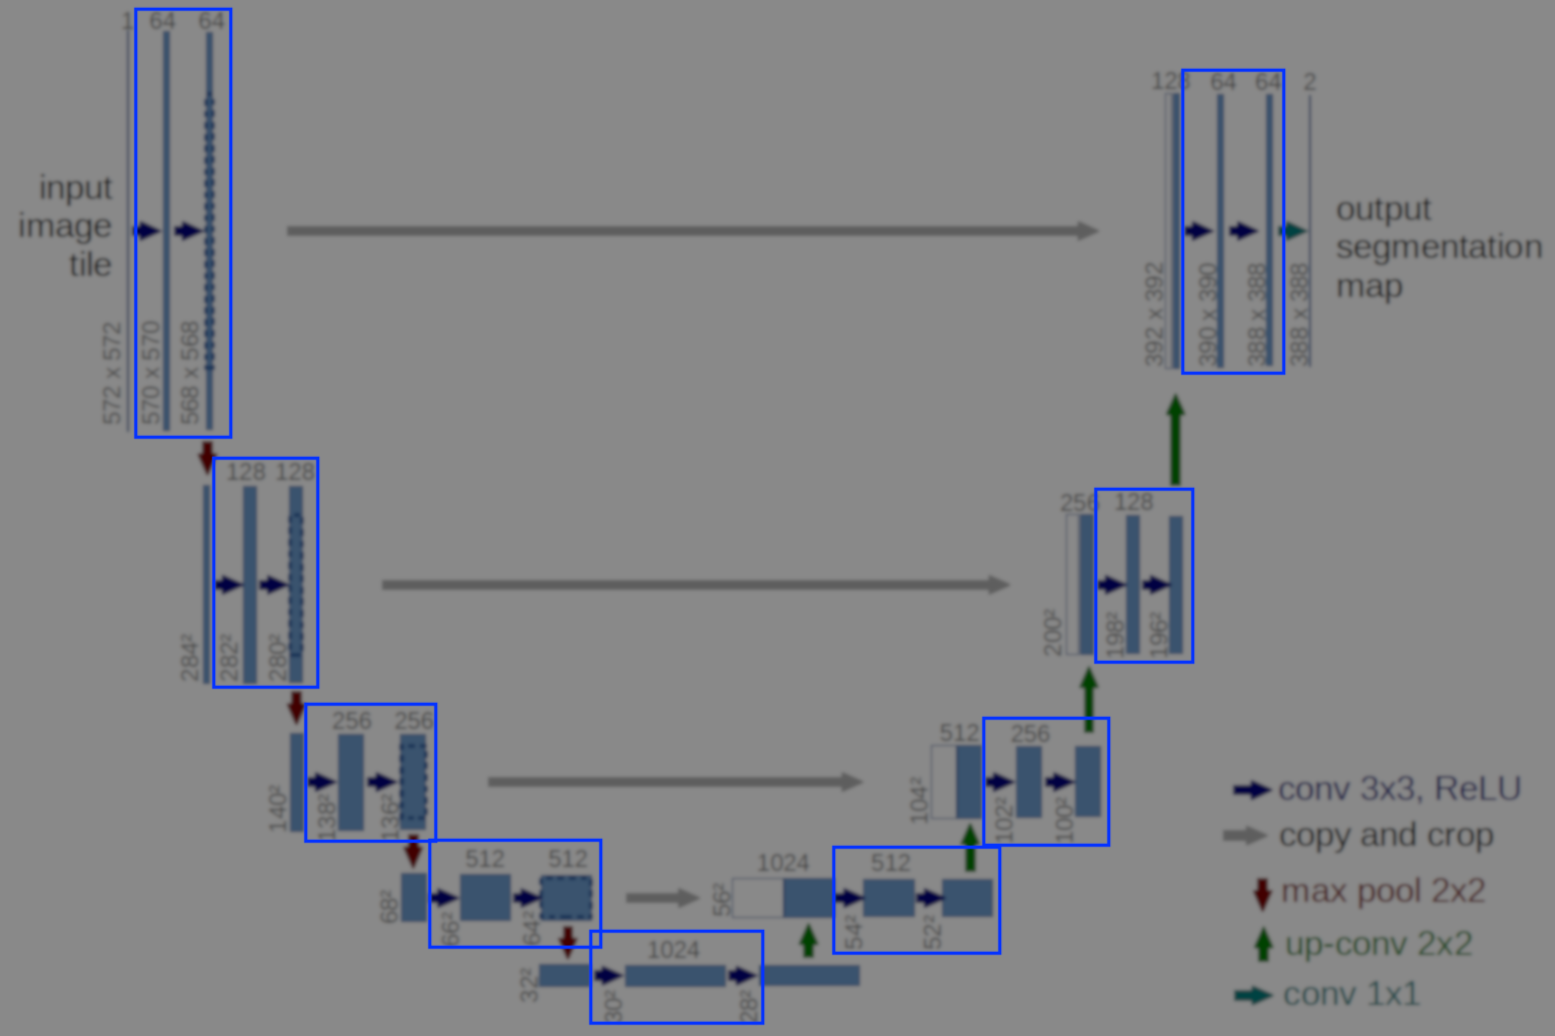
U-Net architecture
U-Net is a specific FCNN architecture and its most important aspect is that it contains an encoder and a decoder parts. By encoding I mean the network (through a series of convolutions) finds a representation of the input in a set of encodings of smaller dimensionalities. The decoding bit (through a series of transposed convolutions) brings these encodings to the original dimensionality with a different representation.
At a very high level the way I like to think about this type of architecture is the network is forcing the original image to be squeezed through the left part to be represented to its essential components and in the right part we bring it to the original hyperdimensional space with representations that match what we are interested in predicting.
Bellow is an illustration from the paper where you can see the left and right part as the encoding and decoding bits forming a U shape.
|
|
|
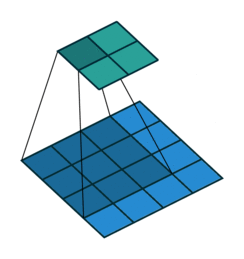
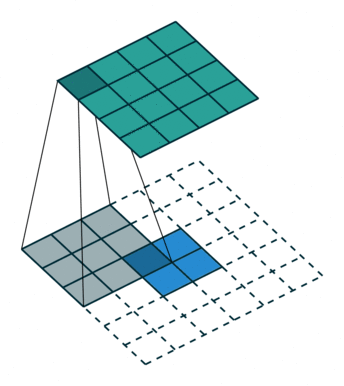
A remark on the “up convolution” (or transposed convolution) operator in the network. This is actually a normal convolution that is built in a way that the output is actually bigger then the input. Bellow are visualizations for both types of convolutions taken from here.
Blue maps are inputs, and cyan maps are outputs.
|
|
|
|
|
Although adding padding is not how the transposed convolution is computed it’s comparable and a more easy way to understand that it is a normal convolution where the output happens to be bigger then the input.
Feeding data to Tensorflow
When I worked with smaller datasets, in previous posts, I would create a Placeholder tensor and fill that when running the graph with whatever data I had in the memory of my python script using the feed_dict parameter. This going back and forth forces the python runtime and tensorflow to exchange content creating copies in memory and slowing down computation. For such a neural network on images this becomes quite a bottleneck so this mechanism of feeding the values of the placeholders to tensorflow at run time cannot be used.
This is the reason for using the Tensorflow Data API. Using the TFRecord I will serialize all the training data using Protobuf in a single file that will be hooked up directly to the computation graph using a queue and multiple threads.
First download the COCO Train Images dataset for 2017 (including its annotations).
Converting COCO dataset to TFRecord file
We will create a TFRecord file with the data in the representation we want to use in Tensorflow. In this case each record will have an arbitrary sized matrix with the content of each RGB image and a corresponding binary mask with the same size representing if a pixel in that image belongs to a cat or not.
In the script bellow
writer = tf.python_io.TFRecordWriter(outFile)
i = 1
for imgId in imgIds:
    print("{:10.2f}%".format(100*(float)(i)/len(imgIds)), end='\r')
    image = next(self.getImagesFromImgIds(imgId))[..., ::-1]
    mask = self.getBinaryMaskFromImgId(imgId, classNames)
    features = {
        "imageContent": tf.train.Feature(bytes_list=tf.train.BytesList(value=[image.tostring()])),
        "maskContent": tf.train.Feature(bytes_list=tf.train.BytesList(value=[mask.tostring()])),
        "height": tf.train.Feature(int64_list=tf.train.Int64List(value=[image.shape[0]])),
        "width": tf.train.Feature(int64_list=tf.train.Int64List(value=[image.shape[1]])),
    }
    example = tf.train.Example(features=tf.train.Features(feature=features))
    writer.write(example.SerializeToString())
    i += 1
writer.close()
The full script to convert the COCO dataset to a TFRecord file is available here.
Connecting TFRecord to Tensorflow graph
Bellow is a sample from here where I create an iterator for the previously created TFRecord, get handles on the Tensors representing the training data in a batch and create a loop where I would run the entire graph. Only when running the graph will the records actually be read and parsed from disk.
When creating our iterator we have created it as initializable. This detail is important because at every epoch end we will need to re-initialize it to go through all the batches again.
def GetDataIterator(tfrecordPath, batchSize=7):
    def decode(serialized_example):
        features = {
            "imageContent": tf.FixedLenFeature([], tf.string),
            "maskContent": tf.FixedLenFeature([], tf.string),
            "height": tf.FixedLenFeature([], tf.int64),
            "width": tf.FixedLenFeature([], tf.int64),
        }
        example = tf.parse_single_example(serialized_example, features)

        imageContent = tf.decode_raw(example['imageContent'], tf.uint8)
        maskContent = tf.decode_raw(example['maskContent'], tf.uint8)
        height = example['height']
        width = example['width']
        imageShape = tf.stack([height, width, 3])
        maskShape = tf.stack([height, width, 1])
        image = tf.reshape(imageContent, imageShape)
        mask = tf.reshape(maskContent, maskShape)
        resizedImage = tf.image.resize_image_with_crop_or_pad(image, 572, 572)
        resizedMask = tf.image.resize_image_with_crop_or_pad(mask, 388, 388)
        return (tf.cast(resizedImage, tf.float32),
                tf.cast(resizedMask, tf.float32))

    dataset = tf.data.TFRecordDataset(tfrecordPath)
    dataset = dataset.map(decode)
    batch = dataset.batch(batchSize)
    iterator = batch.make_initializable_iterator()
    return iterator

...

iterator = GetDataIterator("<PATH TO TFRECORD>", batchSize=10)
X, y = iterator.get_next()

...

with tf.Session() as sess:
...
    for epoch in range(1, epochs+1):
        ...
        sess.run(iterator.initializer)
        ...
        try:
            while True:
                # Run the graph here
        except tf.errors.OutOfRangeError: # end of epoch
            pass
Tensorflow model
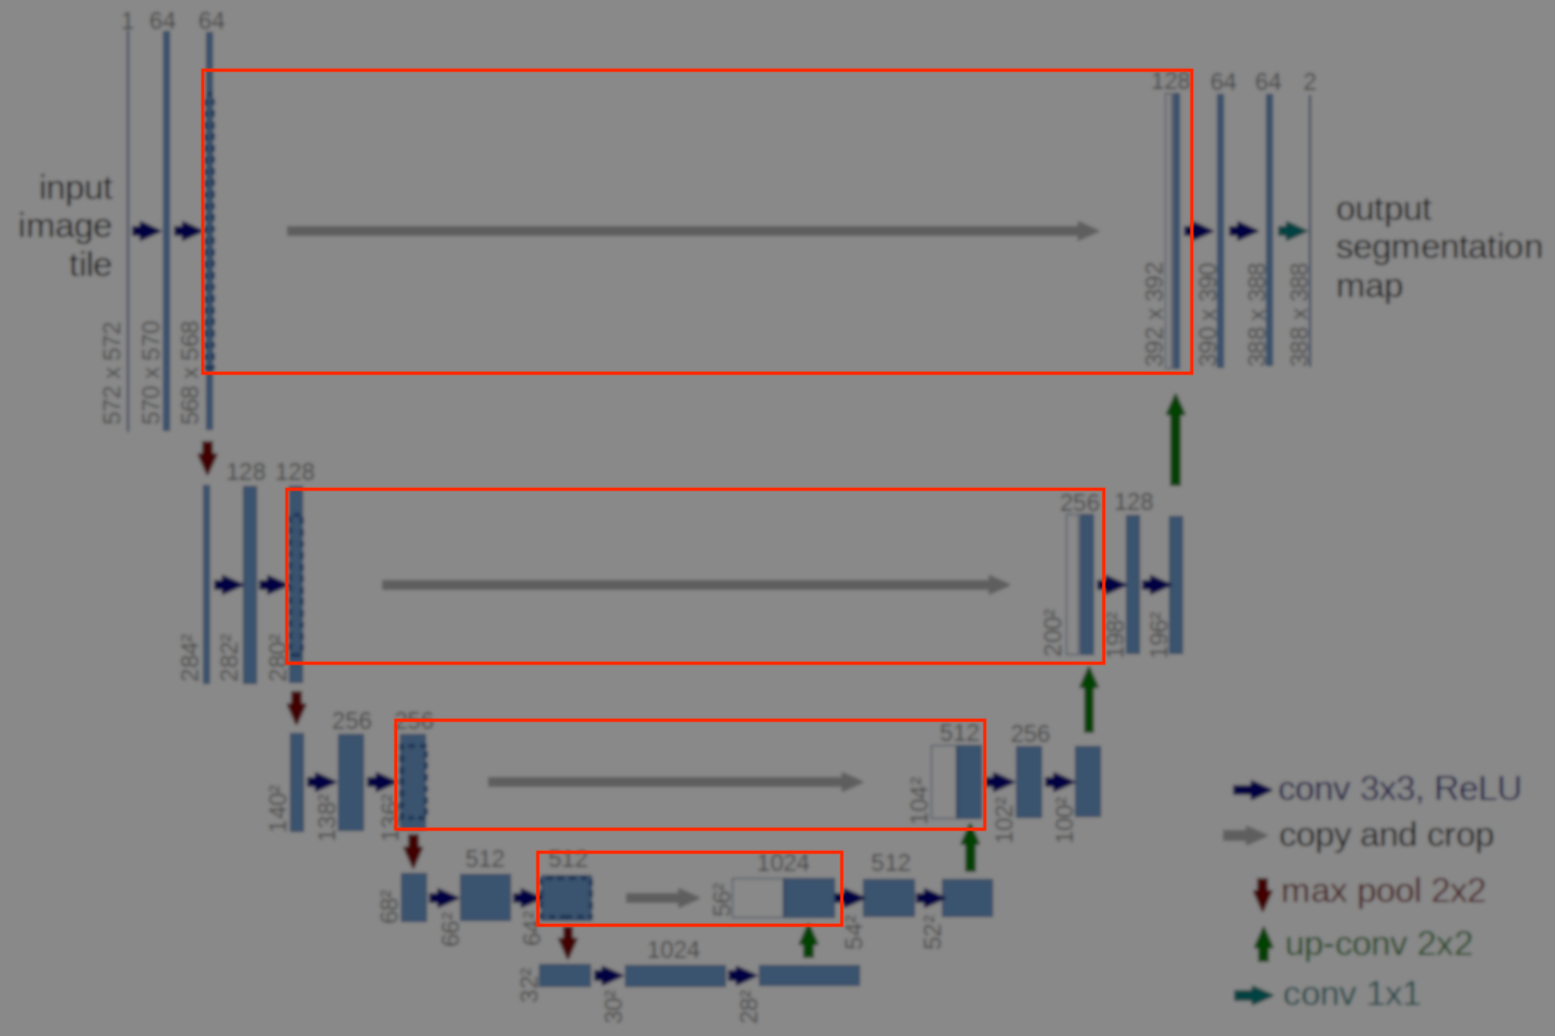
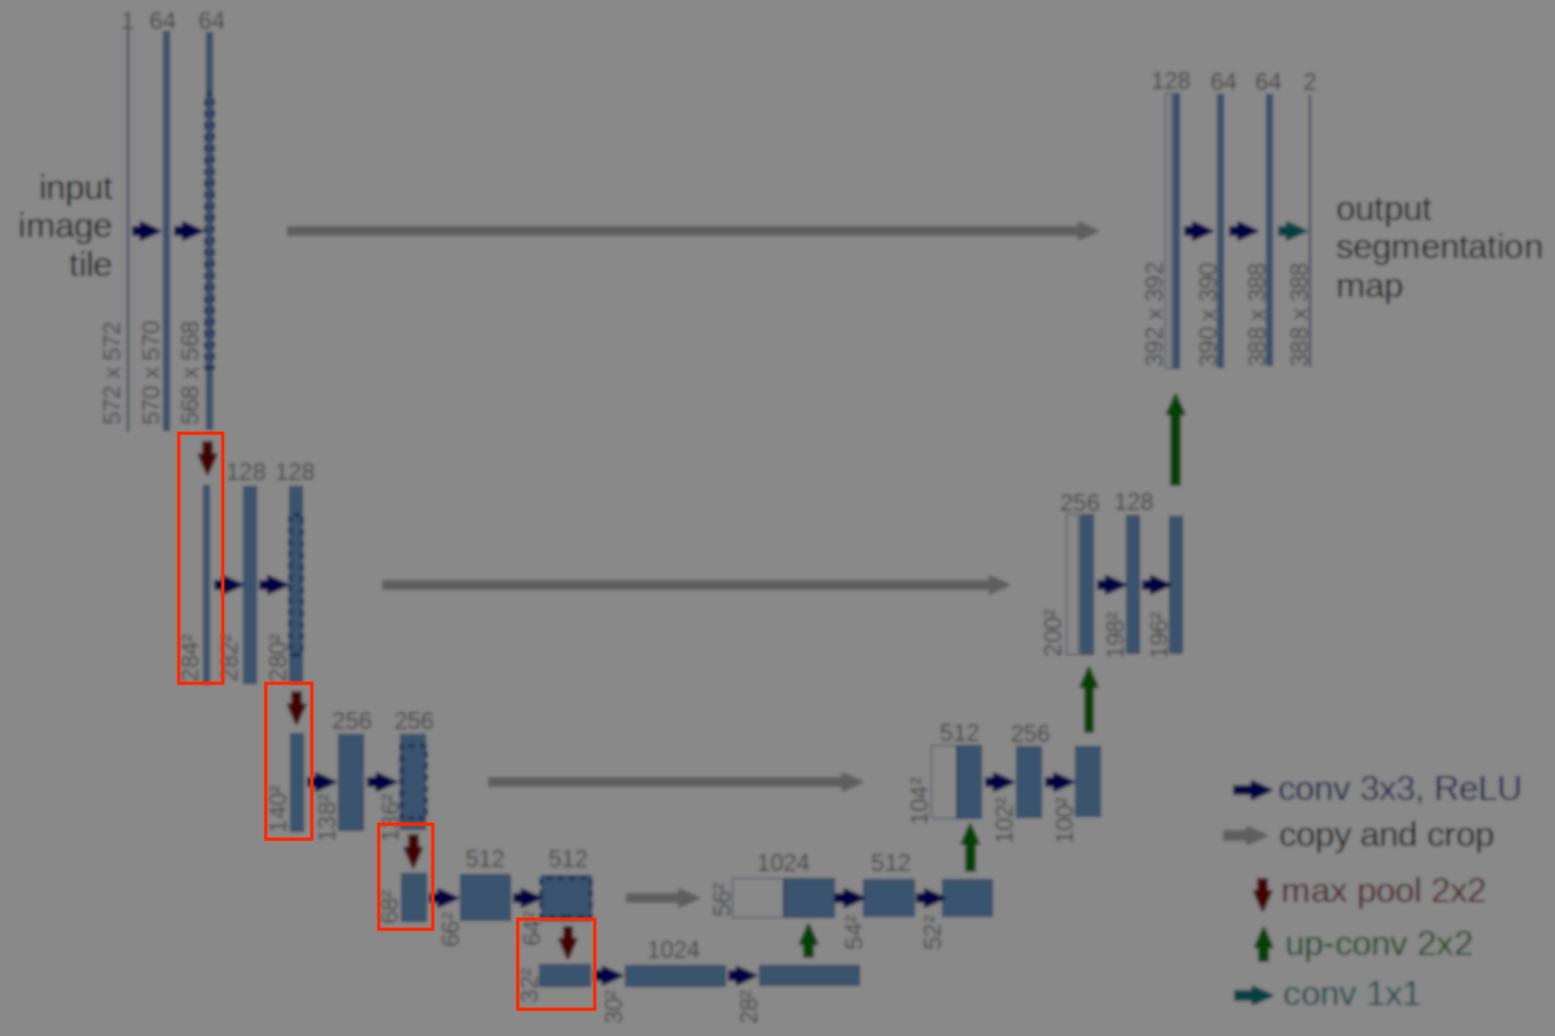
This is the part where we actually create the graph that will implement the U-Net architecture. I will create 5 methods that will represent the 5 basic blocks in the architecture:
- conv 3x3, ReLU
- copy and crop
- max pool 2x2
- up-conv 2x2
- conv 1x1
Using these blocks I will then build the Tensorflow graph implementing the U-Net architecture.
|
|
|
def convolutions(inputLayer, numChannels):
    conv_1 = tf.layers.conv2d(inputLayer,
                              numChannels,
                              [3, 3],
                              padding="valid",
                              activation=tf.nn.relu)
    batchnorm_1 = tf.layers.batch_normalization(conv_1, training=True)
    conv_2 = tf.layers.conv2d(batchnorm_1,
                              numChannels,
                              [3, 3],
                              padding="valid",
                              activation=tf.nn.relu)
    batchnorm_2 = tf.layers.batch_normalization(conv_2, training=True)
    return batchnorm_2
|
|
|
def mergeLayers(inputLayer, siblingLayer):
    inputLayerShape = inputLayer.shape.as_list()[1]
    siblingLayerShape = siblingLayer.shape.as_list()[1]
    begincrop = (int)((siblingLayerShape - inputLayerShape)/2)
    croppedSiblingLayer = slice(siblingLayer,
                                [0, begincrop, begincrop, 0],
                                [-1, inputLayerShape, inputLayerShape, -1])
    mergedLayer = concat([croppedSiblingLayer, inputLayer], 3)
    return mergedLayer
|
|
|
def maxPool(inputLayer):
    return tf.layers.max_pooling2d(inputLayer, 2, 2, padding='valid')
|
|
|
def upConvolution(inputLayer, numChannels):
    upconv = tf.layers.conv2d_transpose(inputLayer,
                                        numChannels,
                                        [2, 2],
                                        strides=[2, 2],
                                        padding='valid')
    batchnorm = tf.layers.batch_normalization(upconv, training=True)
    return batchnorm
|
|
|
def outputLayer(inputLayer, numChannels):
    return tf.layers.conv2d(inputLayer,
                            numChannels,
                            [1, 1],
                            padding="valid",
                            activation=tf.sigmoid)
Having built all the components of this architecture we plug them together bellow to realize the full network arhitecture.
def UNet(X):
    conv1 = convolutions(X, 64)
    maxpool1 = maxPool(conv1)
    conv2 = convolutions(maxpool1, 128)
    maxpool2 = maxPool(conv2)
    conv3 = convolutions(maxpool2, 256)
    maxpool3 = maxPool(conv3)
    conv4 = convolutions(maxpool3, 512)
    maxpool4 = maxPool(conv4)
    conv5 = convolutions(maxpool4, 1024)

    upconv1 = upConvolution(conv5, 512)
    merge1 = mergeLayers(upconv1, conv4)
    conv6 = convolutions(merge1, 512)
    upconv2 = upConvolution(conv6, 256)
    merge2 = mergeLayers(upconv2, conv3)
    conv7 = convolutions(merge2, 256)
    upconv3 = upConvolution(conv7, 128)
    merge3 = mergeLayers(upconv3, conv2)
    conv8 = convolutions(merge3, 128)
    upconv4 = upConvolution(conv8, 64)
    merge4 = mergeLayers(upconv4, conv1)
    conv9 = convolutions(merge4, 64)

    return outputLayer(conv9, 1)
Notice the final layer only has 1 channel because that’s the ammount of objects I’m segmenting (cats). I also chose the sigmoid function because I want my output to be a bunch of pixels with numbers between 0 and 1 like my ground truth masks.
Loss function
As a loss function I choose a binary crossentropy because I’m dealing with two classes and I want my network to output 1 when the ground truth masks are 1 and 0 when they are 0.
cost = tf.reduce_sum(tf.keras.backend.binary_crossentropy(y, lu1_4))Evaluation
Tensorboard
Tensorboard is a very handy way to inspect the network as tensors flow through it, for example when I’m training the network to recognize cats I would like to inspect:
- The computation graph
- The cost function value in each training batch
- Example of the images, masks and predictions each training batch.
Bellow are the important lines to look for in the full code where I’m writting to the directory logs the information needed at every training batch.
tf.summary.scalar("cost", cost)
tf.summary.image("trainingImages", X, max_outputs=2)
tf.summary.image("trainingMasks", y, max_outputs=2)
tf.summary.image("trainingPred", y_hat, max_outputs=2)
summaryOp = tf.summary.merge_all()
...
writer = tf.summary.FileWriter("logs", sess.graph)
...
_, c, summary = sess.run([optimizer, cost, summaryOp])
writer.add_summary(summary, runnr)
To start Tensorboard I need to point it to the directory logs like bellow and access the interface via browser.
$ tensorboard --logdir logs/ --debugger_port 6064 --port 6006You should see the bellow graph representation of the network
|
|
|
Also in Tensorboard you should see the loss function decrease as the network learns to detect cats in the training data like bellow.
|
|
|
Using a GPU for this is a requisite to perform the training in usefull time. To use a GPU (if one exists) is done when creating the session like the example bellow taken from the full code.
    ...
    config = tf.ConfigProto(device_count={'GPU': 1}, log_device_placement=True)
    with tf.Session(config=config) as sess:
        ...
In the Images section of Tensorboard you should also see something like bellow as the network makes better and better predictions to where cats are in the picture.
|
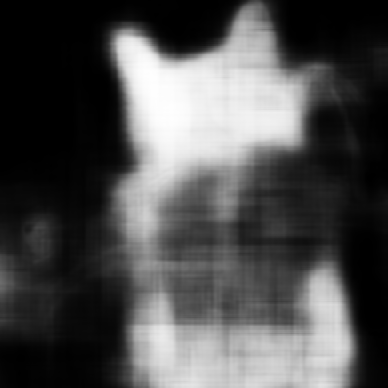
|
|
|
|
You can download the entire source code here for the dataset conversion and here for the neural network.